How can a few lines make a room look deep?
A rectangle can become the back wall of a room with only a few extra lines. In a one-point view, edges running straight away from you aim toward one vanishing point. Keep the front-facing horizontals and verticals separate, and a small drawing begins to hold a believable space.
Choose a view the method can describe
Imagine standing still and looking level toward a rectangular room's far wall. That wall faces you squarely; the floor and side walls extend away from you. This is the deliberately simple view we will construct. One-point perspective is a way to represent depth on a flat surface, not a rule that every line in every drawing must obey. Getty's definition of one-point perspective
The “picture plane” is the imaginary flat window through which you see the room. Edges perpendicular to that plane recede toward the same vanishing point. Edges parallel to the plane keep their directions instead. Stony Brook mathematician Tony Phillips explains the construction in terms of a fixed eye and the intersections of sight lines with that window. The geometry behind the drawing
For this exercise, leave out chairs turned at angles, sloping ceilings and curved walls. An empty room will make the important relationships easier to see. A pencil, ruler and plain paper are enough; the measurements below are drawing dimensions, not a survey of a building.
Set the eye level before the walls
Draw a frame 20 centimetres wide and 16 centimetres high. Measure 6 centimetres down from its top and lightly draw a horizontal line. Mark V halfway across that line, 10 centimetres from either side.
This line represents the viewer's eye level, often called the horizon line. It can pass through an indoor wall even though no distant outdoor horizon is visible. It also need not sit halfway up the page. The University of Texas's room-drawing exercise similarly starts with an eye-level line and a chosen vanishing point. An eye-level room construction
Our line sits above the frame's middle because we chose a view with more floor below eye level than ceiling above it. V is a construction point, not a hole in the back wall or a place the room physically ends. Keep it faint enough to erase later.
Turn a small rectangle into a room
Inside the frame, mark a rectangle whose left and right sides are 7 and 13 centimetres from the frame's left edge. Its top is 4.2 centimetres below the frame's top; its bottom is 9 centimetres below it. This is the back wall.
Connect each corner of that rectangle to the corresponding corner of the outer frame. The four diagonal lines now separate the floor, ceiling and side walls. Extend them lightly inward across the back wall: all four meet V. Darken the actual room edges, leaving those extensions as pale construction lines.
The back wall's top and bottom remain horizontal. Its left and right edges remain vertical. Sending those lines to V would bend the wall into a different shape. Add a small rectangular window on the back wall if you wish, keeping its edges horizontal and vertical too.
Expand the diagram
Scroll within the diagram horizontally; arrow keys work when focused.
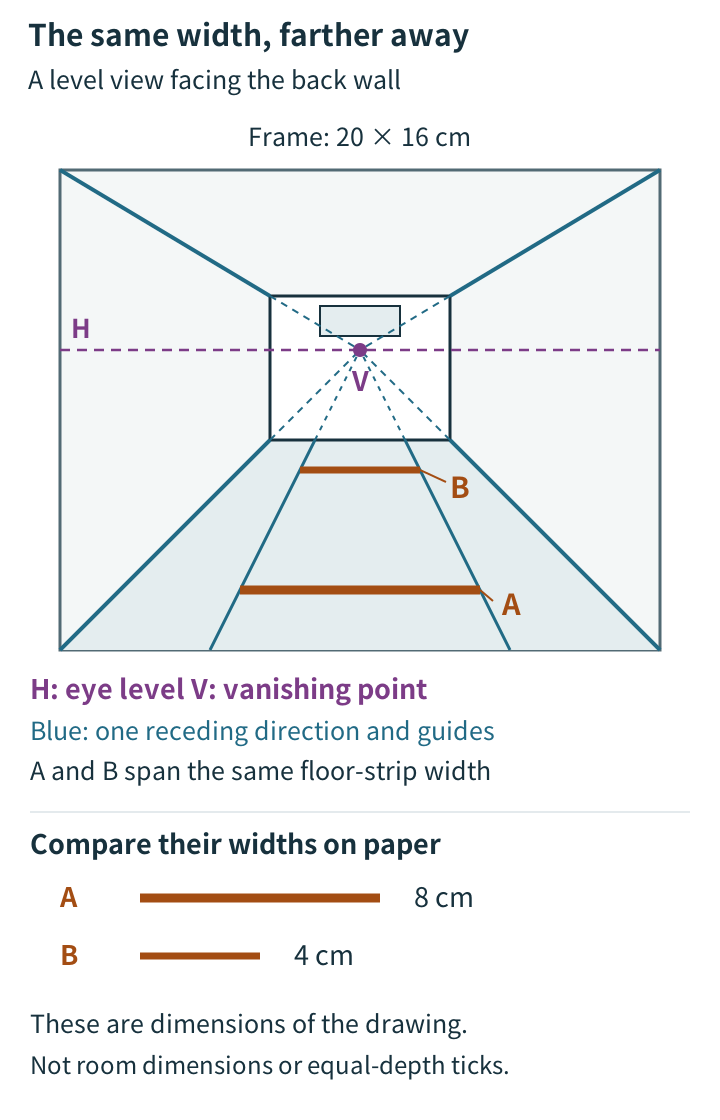
Our diagram uses this exact layout. Solid blue lines mark receding room edges; dashed blue segments show their extensions. The purple dashed line is eye level. The drawing is newly constructed geometry, not a traced museum image or a sketch made inside a real room.
Use two floor bars to check the depth
At the frame's bottom edge, mark points 5 and 15 centimetres from the left. Connect each to V, but keep only the portions on the floor. These lines describe the sides of an imagined straight strip running along the floor.
Now draw an orange crossbar A between those two lines, 14 centimetres below the frame's top. Draw crossbar B at 10 centimetres below the top. A measures 8 centimetres across the page; B measures 4. The bars span the same imagined floor-strip width, but the farther one is half as wide in the drawing.
You can check the numbers without judging how “realistic” your drawing feels. Relative to eye level, A sits 8 centimetres lower and B sits 4 centimetres lower. The two similar triangles therefore give a two-to-one width ratio. This is a property of our constructed example; it does not tell you the room's actual length in metres.
Do not add equally spaced horizontal lines down the page and call them equal floor tiles. Equal intervals in a real receding floor generally become closer together in its perspective image. Phillips identifies that spacing problem separately from finding the vanishing point. For now, the two bars test width, not equal distance along the floor.
Find one useful correction
Before adding colour, check one diagonal against V. If it misses, redraw that edge rather than decorating around it. Then check a back-wall corner: are its two edges still horizontal and vertical? These are different checks for different families of lines.
The Cleveland Museum of Art's perspective activity invites readers to follow receding lines and notice apparent size changes. You can use that looking habit with your own drawing too: describe exactly which relationship creates depth, rather than deciding only that the picture looks good or bad. The museum's perspective activity
If you turn to face the room's corner, both principal horizontal directions can recede, requiring two vanishing points in a level view. Tilting the view introduces further changes. Columbia's architectural drawing material distinguishes these orientations; one point is not a universal shortcut. One-, two- and three-point views
You can finish with an unshaded room and still have learned something precise: depth comes from consistent relationships among lines and sizes. Perspective is one artistic tool. A picture need not use this construction to be worthwhile.
Sources and verification
Sources checked October 11, 2026 UTC. The room and numerical example are original constructions. No real-room measurement, physical drawing trial, reader test or museum visit was performed.