Sew a shirt button back on, then check that it fastens
A button can be attached and still be awkward to use. It may sit off-center, pinch the shirt front, or leave too little room for the buttonhole fabric. Finish this repair by fastening and unfastening the button, with the shirt laid flat.
This guide covers one flat, two-hole button on an adult's ordinary woven shirt, with sound fabric and an intact buttonhole. It excludes children's clothing, protective garments, waterproof or coated materials, leather, knits, heavy lined clothing, rivets, and snaps. Ask a clothing-repair professional about torn or thinning fabric, fraying buttonholes, or unfamiliar construction.
Start with the button and a clear work surface
Use the original button if it is undamaged. Otherwise, look inside the shirt for its supplied spare. Select a hand-sewing needle that passes easily through both the fabric and the button holes. Patagonia's tool guidance
Gather sewing thread, small scissors, and a pincushion or closable needle case. Fabric-marking chalk is optional. Take the shirt off and work in good light at a stable surface. Put the needle away whenever you pause; never hold it in your mouth. Keep loose buttons and sharp tools away from children and pets.
Check the button type before threading. Four holes require a different stitch arrangement. A manufactured shank button has a projecting loop on its back, rather than holes through its face. Neither is the worked example here. Patagonia's button types
Find the position before removing the evidence
Look at the old thread and neighboring buttons. Overlap the shirt fronts normally, without stretching them, and compare the original sewing position with the buttonhole. Patagonia's iFixit guide uses the buttonhole to locate the attachment point. If marking is necessary, first test a suitable fabric marker somewhere inconspicuous. Positioning guidance
Separate the fronts again before sewing. The placket is the reinforced strip along the opening. You will sew through the button-bearing placket, including its own folded layers, but not through the opposite, buttonhole-bearing front. Keep the shirt's back clear too.
Remove only old thread you can distinguish safely from the cloth. If the location is uncertain, get help establishing it; do not shift neighboring buttons to compensate. Treat this as restoring one fastening, rather than altering the shirt's fit.
Prepare the thread and the space beneath the button
Pass thread through the needle, bring its two ends together, and knot them together: make a small loop, pass the ends through, and tighten. The needle now carries doubled thread. Add another knot at the same point if the first is too small to stop against the fabric. Doubled thread and starting knots
Keep enough working thread for the finishing knot. If the thread tangles, stop and untangle it rather than pulling the knot into the cloth.
The sewing sequence below follows Brother Japan's two-hole method. Hold a little space under the button throughout; it must accommodate the fabric containing the buttonhole. Brother's hand-sewing method, in Japanese
- At the attachment point, take the needle from the front of the placket to the back, then return nearby. The starting knot will be hidden beneath the button.
- Go up through one button hole, down through the other, then down through the placket.
- Repeat that route from the back of the placket, keeping the button raised and the cloth flat.
- Finish by bringing the needle through the cloth into the gap below the button. Wrap the thread around the bundle connecting button and cloth, then pass through the cloth to the back.
Brother's example suggests about four passes and three wraps. These are instructions for that example, not a universal strength standard. Stop if the needle resists; do not force it.
Understand what the little thread column does
Open the original position and thread-shank diagram
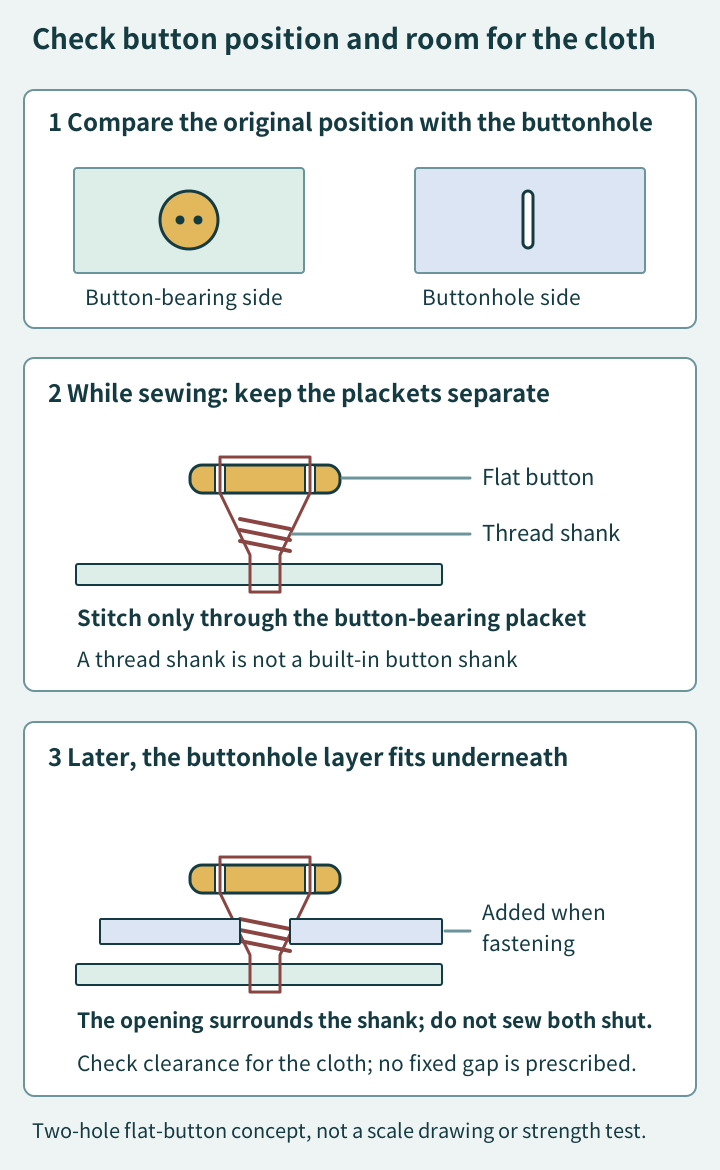
The wrapped column beneath the flat button is a thread shank. It is made from sewing thread, unlike a manufactured button shank.
The drawing separates position, sewing, and fastening. In the sewing cross-section, the only fabric pierced is the supporting placket. In the fastened view, the buttonhole-bearing fabric sits between that placket and the button. It joins the stack only when you fasten the shirt; it is never sewn into place.
Use the drawing to identify those layers, not to measure a fixed gap. If you cannot tell which cloth the needle will enter, spread the shirt out again before continuing. Keeping the two fronts separate is more important than matching the drawing's proportions.
Secure the thread and put the needle away
On the reverse, lay the needle beside the point where the thread emerges. Wrap the thread around the needle about twice. Hold the wraps near the cloth and draw the needle through so the knot settles at the fabric. Keep fingers clear of the needle's exit path. Trim with a short tail, without clipping the knot, and store the needle. A loose or floating knot needs attention before you call the job finished. Brother's finishing-knot guidance, in Japanese
Check one complete fastening
Inspect both sides for caught fabric, hanging thread loops, or a knot coming undone. Then gently button and unbutton the shirt on the work surface.
- Position: do the front edges lie naturally alongside the neighboring fastenings?
- Clearance: does the buttonhole fabric fit underneath without puckering?
- Closure: can you fasten and release it without forcing it or loosening the stitches?
If it catches, stop. Identify whether the issue is button size, position, or clearance. Do not enlarge the buttonhole or pull harder to make the result work. Seek professional help if you are unsure how to redo it safely or notice damaged cloth.
Once the fastening works and the tools are stored, this small repair is finished. Gentle handling checks usability; it is not a pull-strength or wash-durability test.
Sources checked October 10, 2026, Japan time. Text and diagrams were created for this article. No physical sewing, wear, laundering, strength, or reader-usability tests were performed.